If you happen to’re following alongside, that is the third publish in a collection concerning the new CSS form() perform. We’ve realized how to attract strains and arcs and, on this third half, I’ll introduce the curve command — the lacking command it’s good to know to have full management over the form() perform. In actuality, there are extra instructions, however you’ll hardly ever want them and you may simply find out about them later by checking the documentation.
The curve command
This command provides a Bézier curve between two factors by specifying management factors. We are able to both have one management level and create a Quadratic curve or two management factors and create a Cubic curve.
Bézier, Quadratic, Cubic, management factors? What?!
For a lot of of you, that definition is just unclear, and even ineffective! You’ll be able to spend a couple of minutes studying about Bézier curves however is it actually price it? In all probability not, except your job is to create shapes all of the day and you’ve got a strong background in geometry.
We have already got cubic-bezier() as an easing perform for animations however, truthfully, who actually understands the way it works? We both depend on a generator to get the code or we learn a “boring” rationalization that we neglect in two minutes. (I’ve one proper right here by the way in which!)
Don’t fear, this text won’t be boring as I’ll largely concentrate on sensible examples and extra exactly the use case of rounding the corners of irregular shapes. Here’s a determine as an instance a number of examples of Bézier curves.
The blue dots are the beginning and ending factors (let’s name them A and B) and the black dots are the management factors. And see how the curve is tangent to the dashed strains illustrated in purple.
On this article, I’ll contemplate just one management level. The syntax will observe this sample:
clip-path: form(
  from Xa Ya,
  curve to Xb Yb with Xc Yc
);
arc command vs. curve command
We already noticed in Half 1 and Half 2 that the arc command is helpful establishing rounded edges and corners, nevertheless it won’t cowl all of the circumstances. That’s why you have to the curve command. The tough half is to know when to make use of every one and the reply is “it relies upon.” There is no such thing as a generic rule however my recommendation is to first see if it’s potential (and straightforward) utilizing arc. If not, then you need to use curve.
For some shapes, we are able to have the identical outcome utilizing each instructions and this can be a good place to begin for us to know the curve command and evaluate it with arc.
Take the next instance:
That is the code for the primary form:
.form {
  clip-path: form(from 0 0,
    arc to 100% 100% of 100% cw,
    line to 0 100%)
}
And for the second, we now have this:
.form {
  clip-path: form(from 0 0,
    curve to 100% 100% with 100% 0,
    line to 0 100%)
}
The arc command wants a radius (100% on this case), however the curve command wants a management level (which is 100% 0 on this instance).

Now, in the event you look intently, you’ll discover that each outcomes aren’t precisely the identical. The primary form utilizing the arc command is creating 1 / 4 of a circle, whereas the form utilizing the curve command is barely completely different. If you happen to place each of them above one another, you may clearly see the distinction.
That is fascinating as a result of it means we are able to spherical some corners utilizing both an arc or a curvehowever with barely completely different outcomes. Which one is best, you ask? I might say it is dependent upon your visible desire and the form you’re creating.
In Half 1, we created rounded tabs utilizing the arc command, however we are able to additionally create them with curve.
Can you notice the distinction? It’s barely seen nevertheless it’s there.
Discover how I’m utilizing the by directive the identical method I’m doing with archowever this time we now have the management level, which can be relative. This half could be complicated, so pay shut consideration to this subsequent bit.
Contemplate the next:
form(from Xa Ya, curve by Xb Yb with Xc Yc)It signifies that each (Xb,Yb) and (Xc,Yc) are relative coordinates calculated from the coordinate of the place to begin. The equal of the above utilizing a to directive is that this:
form(from Xa Ya, curve to (Xa + Xb) (Ya + Yb) with (Xa + Xc) (Yb + Yc))We are able to change the reference of the management level by including a from directive. We are able to both use begin (the default worth), finishor origin.
form(from Xa Ya, curve by Xb Yb with Xc Yc from finish)The above signifies that the management level will now contemplate the ending level as a substitute of the place to begin. The result’s much like:
form(from Xa Ya, curve to (Xa + Xb) (Ya + Yb) with (Xa + Xb + Xc) (Ya + Yb + Yc))If you happen to use originthe reference would be the origin, therefore the coordinate of the management level turns into absolute as a substitute of relative.
The from directive might add some complexity to the code and the calculation, so don’t hassle your self with it. Merely comprehend it exists in case you face it, however maintain utilizing the default worth.
I believe it’s time in your first homework! Just like the rounded tab train, attempt to create the inverted radius form we coated within the Half 1 utilizing curve as a substitute of arc. Listed below are each variations so that you can reference, however attempt to do it with out peeking first, in the event you can.
Let’s draw extra shapes!
Now that we now have a very good overview of the curve command, let’s contemplate extra complicated shapes the place arc gained’t assist us around the corners and the one answer is to attract curves as a substitute. Contemplating that every form is exclusive, so I’ll concentrate on the approach fairly than the code itself.
Slanted edge
Let’s begin with an oblong form with a slanted edge.

Getting the form on the left is sort of easy, however the form on the precise is a bit tough. We are able to spherical two corners with a easy border-radiushowever for the slanted edge, we’ll use form() and two curve instructions.
Step one is to put in writing the code of the form with out rounded corners (the left one) which is fairly simple since we’re solely working with the line command:
.form {
--s: 90px; /* slant dimension */
clip-path:
form(from 0 0,
line to calc(100% - var(--s)) 0,
line to 100% 100%,
line to 0 100%
);
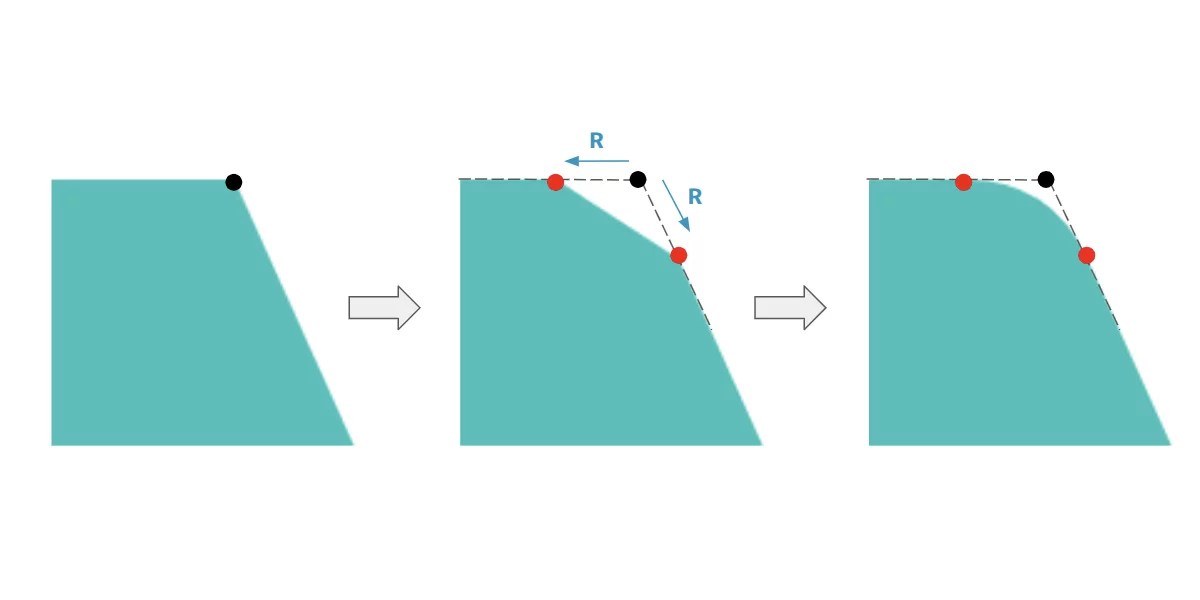
}Then we take every nook and attempt to spherical it by modifying the code. Here’s a determine as an instance the approach I’m going to make use of for every nook.

We outline a distance, Rthat controls the radius. From either side of the nook level, I transfer by that distance to create two new factors, that are illustrated above in purple. Then, I draw my curve utilizing the brand new factors as beginning and ending factors. The nook level would be the management level.
The code turns into:
.form {
  --s: 90px;  /* slant dimension */

  clip-path:
    form(from 0 0,
    Line  to Xa Ya,
    curve to Xb Yb with calc(100% - var(--s)) 0,
    line to 100% 100%,
    line to 0 100%
    );
}
Discover how the curve is utilizing the coordinates of the nook level within the with directive, and we now have two new factors, A and B.
Till now, the approach shouldn’t be that complicated. For every nook level, you change the line command with line + curve instructions the place the curve command reuses the previous level in its with directive.
If we apply the identical logic to the opposite nook, we get the next:
.form {
  --s: 90px;  /* slant dimension */

  clip-path:
    form(from 0 0,
    line  to Xa Ya,
    curve to Xb Yb with calc(100% - var(--s)) 0,
    line  to Xc Yc,
    curve to Xd Yd with 100% 100%,
    line to 0 100%
    );
}
Now we have to calculate the coordinates of the brand new factors. And right here comes the tough half as a result of it’s not at all times easy and it could require some complicated calculation. Even when I element this case, the logic gained’t be the identical for the opposite shapes we’re making, so I’ll skip the maths half and provide the last code:
.field {
  --h: 200px; /* ingredient peak */
  --s: 90px;  /* slant dimension */
  --r: 20px;  /* radius */

  peak: var(--h);
  border-radius: var(--r) 0 0 var(--r);
  --_a: atan2(var(--s), var(--h));
  clip-path:
    form(from 0 0,
    line  to calc(100% - var(--s) - var(--r)) 0,
    curve by calc(var(--r) * (1 + sin(var(--_a))))
              calc(var(--r) * cos(var(--_a)))
    with var(--r) 0,
    line  to calc(100% - var(--r) * sin(var(--_a)))
              calc(100% - var(--r) * cos(var(--_a))),
    curve to calc(100% - var(--r)) 100%  with 100% 100%,
    line to 0 100%
    );
}
I do know the code appears to be like a bit scary, however the excellent news is that the code can be very easy to regulate utilizing CSS variables. So, even when the maths shouldn’t be straightforward to understand, you don’t must take care of it. It ought to be famous that I have to know the peak to have the ability to calculate the coordinates which suggests the answer isn’t good as a result of the peak is a set worth.
Arrow-shaped field
Right here’s an identical form, however this time we now have three corners to spherical utilizing the curve command.
The ultimate code continues to be complicated however I adopted the identical steps. I began with this:
.form {
  --s: 90px;

  clip-path:
    form(from 0 0,
    /* nook #1 */
    line to calc(100% - var(--s)) 0,
    /* nook #2 */
    line to 100% 50%,
    /* nook #3 */
    line to calc(100% - var(--s)) 100%,

    line to 0 100%
    );
}
Then, I modified it into this:
.form {
  --s: 90px;

  clip-path:
    form(from 0 0,
    /* nook #1 */
    line  to Xa Ya
    curve to Xb Yb with calc(100% - var(--s)) 0,
    /* nook #2 */
    line  to Xa Ya
    curve to Xb Yb with 100% 50%,
    /* nook #3 */
    line  to Xa Yb
    curve to Xb Yb with calc(100% - var(--s)) 100%,

    line to 0 100%
    );
}
Lastly, I take advantage of a pen and paper to do all of the calculations.
You would possibly suppose this system is ineffective if you’re not good with math and geometry, proper? Probably not, as a result of you may nonetheless seize the code and use it simply because it’s optimized utilizing CSS variables. Plus, you aren’t obligated to be tremendous correct and exact. You’ll be able to depend on the above approach and use trial and error to approximate the coordinates. It would most likely take you much less time than doing all the maths.
Rounded polygons
I do know you’re ready for this, proper? Because of the brand new form() and the curve command, we are able to now have rounded polygon shapes!

Right here is my implementation utilizing Sass the place you may management the radius, variety of sides and the rotation of the form:
If we omit the complicated geometry half, the loop is sort of easy because it depends on the identical approach with a line + curve per nook.
$n: 9; /* variety of sides*/
$r: .2; /* management the radius [0 1] */
$a: 15deg; /* management the rotation */

.poly {
  aspect-ratio: 1;
  $m: ();
  @for $i from 0 via ($n - 1) {
    $m: append($m, line  to Xai Yai, comma);
    $m: append($m, curve to Xbi Ybi with Xci Yci, comma);
  }
  clip-path: form(#{$m});
}
Right here is one other implementation the place I outline the variables in CSS as a substitute of Sass:
Having the variables in CSS is fairly helpful particularly if you wish to have some animations. Right here is an instance of a cool hover impact utilized to hexagon shapes:
I’ve additionally up to date my on-line generator so as to add the radius parameter. In case you are not aware of Sass, you may simply copy the CSS code from there. Additionally, you will discover the border-only and cut-out variations!

Conclusion
Are we performed with the curve command? In all probability not, however we now have a very good overview of its potential and all of the complicated shapes we are able to construct with it. As for the code, I do know that we now have reached a degree that’s not straightforward for everybody. I might have prolonged the reason by explicitly breaking down the maths, however then this text can be overly complicated and make it seem to be utilizing form() is more durable than it’s.
This mentioned, a lot of the shapes I code can be found inside my on-line assortment that I always replace and optimize so you may simply seize the code of any form!
If you’d like a very good follow-up to this text, I wrote an article for Frontend Masters the place you may create blob shapes utilizing the curve command.